End-to-End Implementation of an Image Caption Generator with CNN and RNN using TensorFlow and Keras
A guide on how to implement a neural image caption generator using TensorFlow, Keras, and Spacy, with beam search at inference time
Originally published onMedium
📷 Image Captioning: an Overview
Image captioning is a Computer Vision task that consists of the generation of a textual description of the content of a given image.
This is a much harder task than classifying an image based on its content since it lies at the intersection between Computer Vision and Natural Language generation and deals with the creation of a model that is capable of understanding and describing the scene.
This task is extremely useful: imagine having a model capable of writing the alt image attribute for HTML pages with a good description of the image, or a model that could be used by screen readers to describe an image when it is not accompanied by an alternative text.
In this blog post, we will see how to implement a neural image caption generator inspired by the 2015 paper Show and Tell: A Neural Image Caption Generator, using TensorFlow and Keras.
A full implementation of the content of this tutorial is available on this GitHub repo.
👀🗣 Show and Tell: A Neural Image Caption Generator
In 2015 Vinyals, Oriol, et al. published the paper Show and Tell: A Neural Image Caption Generator, in which they proposed for the first time an end-to-end system for neural image caption generation, inspired by the encoder-decoder architectures previously proposed in the field of Machine Translation.
Their model architecture is composed of a Convolutional Neural Network used as an encoder for the image (Show) and a Recurrent Neural Network which receives the image encoding as input and produces a caption for the image (Tell). In this way, they put together the best Deep Learning architectures for working with images (CNN) and with sequence data (RNN). Today, RNNs are being substituted by Transformers for NLP tasks, but they are still extensively used for working with other types of sequences (and they were the state-of-the-art for neural text processing in 2015).
Mathematically, we want to train a Neural Network for producing the sequence of words S that maximizes the conditional probability P(S|I), where I is the input image.
Based on this consideration, the training process will consist in finding the best model parameters θ, that is finding the model parameters θ* such that

The formula corresponding to the optimization problem to solve to find the best model parameters
where (I, S) is an image-caption pair in the training set, and the model parameters θ are the model weights we apprehend with backpropagation.
Since S is considered to be a sequence of N+1 tokens S0, S1, …, SN (where we use S0 and SN to denote two special tokens

The chain rule of probability applied to the conditional probability of the caption given the image
and model the last expression in the equations using an RNN, where information about the last t-1 tokens is kept in the hidden state h_t of the cell. This approximation works quite well with short sequences, but for longer sequences, vanilla RNN cells have proved to have problems with “remembering” distant timesteps in the past. That is why different RNN cell architectures have been developed, among which the LSTM cells stood out for the capability of modeling larger sequences with additional long-term memory.
During training, at the first timestep, the network is provided with a dense image encoding produced by the CNN encoder and, subsequently, it starts receiving the tokens of the caption associated with the image as its input for each new timestep. Also for these tokens, the input is a dense representation that in the context of NLP we call a word embedding. The following diagram shows the inner workings of the network during training:
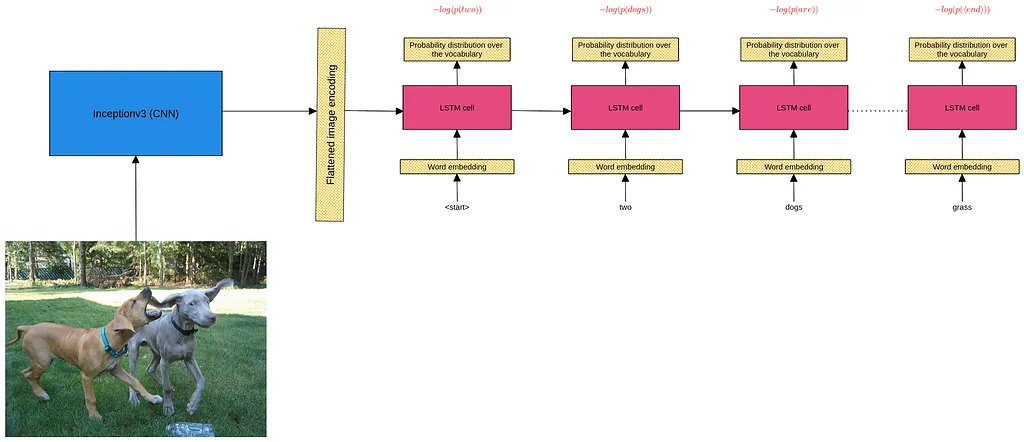
A diagram of the end-to-end neural caption generator, showing the CNN encoder and the LSTM decoder
As we can see, at each timestep, the model performs a multi-class classification over the word vocabulary, outputting the probability that each word follows its prefix. The negative log probability of the actual word is used as the loss for each timestep, according to the maximization formula and the chain rule factorization we previously saw. The losses at each timestep are summed over the entire sequence and then averaged over the batch, to perform a single Gradient Descent step and adjust the model parameters.
We focus particularly on the fact that, at each timestep, the model obtains the words of the real caption as its input. This approach is also called teacher forcing: we don’t want the model to use its output to feed itself at training time. This is because errors would be amplified when the model produces wrong outputs. This problem is called exposure bias.
At inference time, we don’t have any ground truth: the only possibility for the model will be to feed itself with the token outputted at the previous timestep. Beam search is a technique used to produce better sequence outputs with this kind of model.
Now that we have a good mathematical and architectural understanding of the model we can see how to implement it with TensorFlow and Keras!
🗂 Prepare the Data
In this tutorial, I want to show how to create a custom tokenizer with Spacy and how to use TensorFlow’s Data API to provide data to our model.
You will need a dataset of images and correlated textual captions to go along with this tutorial. Maybe you have your dataset but, in case you just want to try things out, you can search for the Flickr8k dataset, a collection of images from Flickr, where each image is associated with 5 different captions.
✂️ Create a Custom Spacy Tokenizer
We will create a CustomSpacyTokenizer that transforms texts into sequences of numbers, where each number represents an index in the tokenizer’s vocabulary. We need this because neural networks can only understand numbers!
The custom tokenizer looks like this:
import spacy

nlp = spacy.load("en_core_web_sm")


class CustomSpacyTokenizer:
    def __init__(self, vocab_size=8000):
        self.max_len = 0
        self.vocab_size = vocab_size

        self.vocab = {
            "<start>": 1,
            "<end>": 2,
            "<oov>": 3
        }

    def fit(self, texts):
        counts = {}
        max_text_len = 2

        for text in texts:
            doc = nlp(text) # process the document with spacy
            text_len = 2
            for token in doc:
                if not token.is_punct and not token.lower_ in counts:
                    # add lowercase token to the counts
                    counts[token.lower_] = 0
                    text_len += 1
                counts[token.lower_] += 1
            if text_len > max_text_len:
                max_text_len = text_len

        # set the max_len if it is -1
        self.max_len = max_text_len

        # sort the words by decreasing number of occurrences
        words = [k for (k, _) in sorted(counts.items(), key=lambda x: x[1])]
        words.reverse()
        words = words[: self.vocab_size - 3] # vocab must have vocab_size

        # the most frequent word will have index 3 or 4 (if oov)
        for i, word in enumerate(words):
            self.vocab[word] = i + 3 # because there are already 3 tokens

    def text_to_sequence(self, text):
        doc = nlp(text)

        # make a sequence with "<start>" and "<end>"
        sequence = [self.vocab["<start>"]]
        for token in doc:
            if token.lower_ in self.vocab:
                sequence.append(self.vocab[token.lower_])
            else:
                sequence.append(self.vocab["<oov>"])
        sequence.append(self.vocab["<end>"])

        # sequence is too large
        if len(sequence) > self.max_len:
            sequence = sequence[: self.max_len]
            sequence[-1] = self.vocab["<end>"]

        # sequence is too small
        sequence += [0] * (self.max_len - len(sequence))

        return sequence

    def sequence_to_text(self, sequence):
        inv_vocab = dict((v, k) for k, v in self.vocab.items())
        return " ".join(inv_vocab[x] for x in sequence if x >= 1)
The tokenizer has four methods: the init instantiates a tokenizer with a vocabulary of words whose size must be at most vocab_size. The initial vocabulary just contains three special tokens we will use in our sequences, namely:
to identify the start of a caption. to identify the end of a caption. to identify the words that are so uncommon that they didn’t make it to the top vocab_size words of our training captions.
The fit method takes a list of texts as input and fills the vocabulary according to these texts. Each text is preprocessed using Spacy, which implements tokenization for English texts in its en_core_web_sm model. With Spacy we can just replace this model with a model for another language to obtain a tokenization process specific to that language. Another important aspect is that any logic we want to implement in creating the vocabulary of words can be added here.
fit takes the vocab_size - 3 most common words in the texts and adds them to the vocabulary with an incremental index.
The final methods text_to_sequence and sequence_to_text perform the conversions for the captions. When we use text_to_sequence, 0-padding is used to pad the sequences to the length of the longest caption we obtained when fitting the model. This is not a strict requirement of the theoretical usage of an RNN, which can work with sequences of any length, but it is needed by Keras since we need to work with fixed-shape tensors.
📼 Create and Store TFRecords
TensorFlow has its own preferred binary file format to store and read data. It is not mandatory to use it, but in this tutorial, we will see how to create some TFRecords out of the images and captions of our dataset.
A TFRecord usually contains tf.train.Examples, which represent instances of our dataset. An Example is made of tf.train.Features, corresponding to the features of our examples.
The first step is to define conversion functions that will convert data into tf.train.Features:
import tensorflow as tf

def _bytes_feature(value):
    """Returns a bytes_list from a string / byte, use it to save strings"""
    if isinstance(value, type(tf.constant(0))):
        value = value.numpy()  # BytesList won't unpack a string from an EagerTensor.
    return tf.train.Feature(bytes_list=tf.train.BytesList(value=[value]))


def _float_feature(value):
    """Returns a float_list from a float / double"""
    return tf.train.Feature(float_list=tf.train.FloatList(value=[value]))


def _int64_feature(value):
    """Returns an int64_list from a bool / enum / int / uint"""
    return tf.train.Feature(int64_list=tf.train.Int64List(value=[value]))


def _tensor_feature(value):
    """Returns a feature tensor"""
    t = tf.constant(value)
    serialized_t = tf.io.serialize_tensor(t)
    return tf.train.Feature(bytes_list=tf.train.BytesList(value=[serialized_t.numpy()]))
We have conversion functions for bytes (strings), floats, integers, and TensorFlow’s tensors.
The following function creates an image-captions example.
def image_example(image_string, captions, tokenizer):
    image_shape = tf.io.decode_jpeg(image_string).shape
    caption_seqs = [
        tokenizer.text_to_sequence(caption) for caption in captions
    ]  # tokenize the textual caption

    feature = {
        "height": _int64_feature(image_shape[0]),
        "width": _int64_feature(image_shape[1]),
        "depth": _int64_feature(image_shape[2]),
        "caption_seqs": _tensor_feature(caption_seqs),
        "image_raw": _bytes_feature(image_string),
    }

    return tf.train.Example(features=tf.train.Features(feature=feature))
The function expects a string representing the image, a list of captions associated with the image, and the tokenizer we’ll use to transform the captions into sequences. We store examples containing the image, the caption sequences (in a tensor having shape (N_CAPTIONS_PER_IMAGE, MAX_CAPTION_LEN)), and additional information about the size of the image.
Finally, this is how we will create and store the TFRecords:
import math

import pandas as pd

def save_tf_records(
    split, input_dir, output_dir, captions_df, tokenizer, n_records_per_file
):
    split_file = (input_dir / f"{split}_split_filenames.txt").open("r")
    split_ids = [
        line.strip() for line in split_file.readlines()
    ]  # image ids (filenames) for the split

    # create the dir for the split data
    os.makedirs(output_dir / split, exist_ok=True)

    # make multiple TFRecords for the images in the split
    # where each record contains n_records_per_file examples
    for file_n in range(math.ceil(len(split_ids) / n_records_per_file)):
        # take the filenames of the images for this record
        first_id_idx = file_n * n_records_per_file
        next_tfrec_ids = split_ids[first_id_idx : first_id_idx + n_records_per_file]

        # define record path
        record_file_path = (
            output_dir / split / f"images_{str(file_n).zfill(3)}.tf_records"
        )

        # write the TFRecord
        with tf.io.TFRecordWriter(str(record_file_path)) as writer:
            for image_id in next_tfrec_ids:
                image_captions = captions_df[captions_df["image"] == image_id][
                    "caption"
                ].tolist()  # make a list of the captions for this image
                if image_id in split_ids:
                    image_string = open(
                        input_dir / "images" / f"{str(image_id)}", "rb"
                    ).read()  # encode image as string
                    tf_example = image_example(
                        image_string, image_captions, tokenizer
                    )  # create an (image, caption) example
                    writer.write(tf_example.SerializeToString())
This function takes a split (a string between “train”, “val” and “test”), and the input_dir path (where the input_dir is a directory containing a sub-directory of images called images and the .txt files
We take the output_dir where a sub-folder for each split will be created to store the records. captions_df is a Pandas dataframe with two columns: “image” and “caption”, where each row contains the filename of an image and its caption (the dataframe can be unique for all the splits).
The tokenizer is a tokenizer already fitted on our captions.
Finally, since it’s better to create multiple TFRecords instead of a single TFRecord for all the examples, we specify the n_records_per_file.
We only need to call directly this last function to create the records. The result will be some directories corresponding to the splits inside the output_dir, where each directory contains many TFRecords. A TFRecord will be a collection of images with the corresponding caption sequences contained in a tensor.
Now that we have our data, let’s create the model!
🚧 Build the Model
We’ll use the Subclassing API to create a custom Keras model.
from tensorflow import keras


class ShowAndTell(keras.Model):
    def __init__(self, img_shape, caption_length, vocab_size, **kwargs):
        super().__init__(**kwargs)
        self.img_shape = img_shape
        self.caption_length = caption_length
        self.vocab_size = vocab_size

        # encoder
        self.inception1 = keras.applications.InceptionV3(
            include_top=False, weights="imagenet", input_shape=img_shape
        )
        self.inception1.trainable = False
        self.max_pool1 = keras.layers.MaxPool2D((5, 5), name="enc_max_pool1")
        self.flatten1 = keras.layers.Flatten(name="enc_flatten1")
        # since we will init-inject the encoding as RNN state
        # we need to have an encoding that has the same size as the
        # RNN state
        self.dense1 = keras.layers.Dense(
            512, activation="tanh", name="enc_dense1"
        )
        self.dropout1 = keras.layers.Dropout(0.3)  # add a dropout over the encoding

        # embedding
        self.embedding1 = keras.layers.Embedding(
            input_dim=vocab_size + 1,  # +1 because 0 is padding
            output_dim=512,
            input_length=caption_length,
            name="embedding1",
        )

        # decoder
        self.lstm1 = keras.layers.LSTM(
            512,
            return_sequences=True,
            name="dec_lstm1",
        )
        self.dropout2 = keras.layers.Dropout(0.5)
        self.output1 = keras.layers.TimeDistributed(
            keras.layers.Dense(vocab_size, activation="softmax"), name="output1"
        )

    def call(self, inputs):
        input_img, input_caption = inputs

        # encode
        inception1 = self.inception1(input_img)
        max_pool1 = self.max_pool1(inception1)
        flatten1 = self.flatten1(max_pool1)
        dense1 = self.dense1(flatten1)
        dropout1 = self.dropout1(dense1)

        # mask padding and embed
        mask = tf.math.not_equal(input_caption, 0)
        embedding1 = self.embedding1(input_caption)

        # decode
        # we set the initial hidden state of the network equal to the image encoding
        lstm1 = self.lstm1(
            embedding1, mask=mask, initial_state=[dropout1, tf.zeros_like(dropout1)]
        )
        dropout2 = self.dropout2(lstm1)
        output1 = self.output1(dropout2, mask=mask)

        return output1
The Subclassing API requires the definition of the layers of the network in the init method of the model. We can pass to init any additional parameters we will need for the model definition. Then, we implement call, which represents the behavior of our network. Here we apply the layers to the inputs to obtain new tensors and let these tensors flow through the network with any additional logic we’d like to add.
The network is composed of an image encoder made of the pretrained (on ImageNet) CNN Inceptionv3 followed by pooling and a Dense layer representing the image encoding. The encoder will work as a feature extractor: we are freezing its weights and optimizing the network starting from its outputs. The dense layer has the same size as the LSTM layer we add to the decoder. This is because we will initialize the state of the LSTM with the image encoding.
Before passing to the decoder, we need an Embedding layer, which associates dense vectors of weights to the words in the vocabulary. We feed the embeddings of the words in the sequence to the LSTM and attach a softmax TimeDistributed layer to each timestep of the LSTM, to obtain the prediction for the next word of the sequence.
Let’s see how we can train this network!
🔨 Train the Model
The first thing we need is to create some tf.data.Datasets out of the TFRecords.
def read_split_dataset(input_dir, img_shape, caption_length, batch_size):
    filenames = tf.data.Dataset.list_files(str(input_dir / "*.tf_records"))
    dataset = tf.data.TFRecordDataset(filenames, num_parallel_reads=tf.data.AUTOTUNE)

    example_feature_description = {
        "height": tf.io.FixedLenFeature([], tf.int64),
        "width": tf.io.FixedLenFeature([], tf.int64),
        "depth": tf.io.FixedLenFeature([], tf.int64),
        "caption_seqs": tf.io.FixedLenFeature([], tf.string),
        "image_raw": tf.io.FixedLenFeature([], tf.string),
    }

    # parse the examples using the description
    def _parse_example_fn(example_proto):
        return tf.io.parse_single_example(example_proto, example_feature_description)

    # make the dataset as a set of ((image, caption_seq), slid_caption_seq) pairs
    # where the slid_caption_seq is the caption_seq shifted one position to the left, to be
    # used as the reference caption for the results
    # because of 0-indexing in the softmax layer we also have to decrease by 1 the slid_caption_seq
    def _to_image_captions_pairs(example):
        image = tf.image.decode_jpeg(
            example["image_raw"], channels=3
        )  # last dim of img_shape is 3
        image = tf.image.resize(image, size=img_shape[:-1])
        image = tf.cast(image, tf.float32)
        image = tf.keras.applications.inception_v3.preprocess_input(image)

        caption_seqs = tf.io.parse_tensor(example["caption_seqs"], out_type=tf.int32)
        caption_seqs = tf.ensure_shape(caption_seqs, [None, caption_length])

        return image, caption_seqs

    def _to_input_output_pairs(image, caption_seq):
        slid_caption_seq = tf.roll(caption_seq, shift=-1, axis=0)
        slid_caption_seq = tf.tensor_scatter_nd_update(
            slid_caption_seq, [[caption_length - 1]], [0]
        )
        slid_caption_seq -= 1

        return (image, caption_seq), slid_caption_seq

    # parse the examples
    parsed_dataset = dataset.map(_parse_example_fn)
    # associate n captions in a single tensor to their image
    image_captions_dataset = parsed_dataset.map(_to_image_captions_pairs)
    # split the captions to make different samples for each image-caption pair
    # and make the ground truth
    image_caption_dataset = image_captions_dataset.flat_map(
        lambda image, captions: tf.data.Dataset.from_tensor_slices(captions).map(
            lambda caption: _to_input_output_pairs(image, caption)
        )
    )

    return image_caption_dataset.batch(batch_size).prefetch(tf.data.AUTOTUNE)
With this function, we obtain a dataset of ((input_imgs, input_captions), output_captions) elements, ready to be given to the model for training.
In this function, we parse the examples and transform the images with the inception_v3.preprocess_input function.
We read the tensor containing multiple captions for each image (remember that an example is made of an image, together with ALL the captions associated with it), and divide the example into many examples (using flat_map), made of pairs image-caption (single caption). An output caption is the expected output of the network for a given example: it is the same caption sequence, shifted one position to the left (we want to predict the second word from the first word and so on), and all the elements in this sequence are decreased by one (since we want the 0-th neuron of the output layer to correspond to the token
Now training the model is easy:
model = ShowAndTell(...)

train_dataset = read_split_dataset(train_dir, ...)
val_dataset = read_split_dataset(val_dir, ...)

model.build(input_shape=[(None,) + img_shape, (None, caption_length)])
model.summary()

# train model
model.compile(
    loss=tf.keras.losses.SparseCategoricalCrossentropy(ignore_class=-1),
    optimizer=keras.optimizers.Adam(learning_rate=learning_rate)
)
model.fit(train_dataset, validation_data=val_dataset, epochs=epochs)
We build the model (since it is required for showing the summary of models made with the Subclassing API) and we start training it.
Our loss function is the sparse categorical cross-entropy, corresponding to the loss explained when we saw the paper, where we ignore the -1 classes in the ground truth. Why? Because they correspond to the padding since we decreased the elements of the sequence by one.
➿ Predict with Beam Search
Wow! We covered so much stuff, but now we are finally ready to make predictions with our model.
At each timestep our network provides us with the probability distribution P(St|I, S0, S1, …, St-1). In a perfect world, we could just choose the element in the vocabulary that maximizes this probability (the softmax result) at each timestep. But this approach doesn’t provide optimal results 😖. This is because the RNN provides just an approximation of the real underlying distribution.
In these cases, we use beam search! This is a technique with which we consider more possible outputs at each timestep. We could see it as an improved Greedy search (in fact Greedy search, which consists in choosing the element with the highest probability at each timestep, is just a beam search with a beam width equal to 1). Let’s implement the beam search for model prediction:
def predict(model: ShowAndTell, image, tokenizer, beam_width=3):
    next_token_idx = tokenizer.vocab["<start>"]
    initial_hypothesis = {"seq": [next_token_idx], "score": 0.0, "norm_score": 0.0}
    beam = [initial_hypothesis]
    image_inp = tf.expand_dims(image, 0)

    for l in range(1, model.caption_length):
        candidates = []
        for hypo in beam:
            if hypo["seq"][-1] == tokenizer.vocab["<end>"]:
                continue
            seq = hypo["seq"] + [0] * (model.caption_length - len(hypo["seq"]))
            seq_inp = tf.constant([seq], dtype=tf.int32)

            distribution = model((image_inp, seq_inp), training=False)[0][
                l - 1
            ].numpy()  # frist batch, first word
            top_indices = np.argsort(distribution)[-beam_width:]
            top_words = [
                int(i) + 1 for i in top_indices
            ]  # +1 because model outputs are decreased by one
            top_probs = distribution[top_indices]

            # add the candidates to the list
            for word, prob in zip(top_words, top_probs):
                candidate_seq = hypo["seq"] + [word]
                candidate_score = hypo["score"] + np.log(prob)
                candidate_norm_score = candidate_score / l

                candidate = {
                    "seq": candidate_seq,
                    "score": candidate_score,
                    "norm_score": candidate_norm_score,
                }
                candidates.append(candidate)

        # keep the top beam_width candidates based on their score
        beam = [hypo for hypo in beam if hypo["seq"][-1] == tokenizer.vocab["<end>"]]
        beam = sorted(beam + candidates, key=lambda x: x["norm_score"], reverse=True)[
            :beam_width
        ]

    return tokenizer.sequence_to_text(beam[0]["seq"])
Don’t be scared by this function! We start with a beam containing a single hypothesis: a sequence containing the only token
The explanation of the algorithm is the following:
- For each hypothesis in the beam we apply the model to the hypothesis, to get the output probability distribution of the model for the next word. We sample only the best beam_width words.
- We create the candidates for this hypothesis: a candidate is made of the hypothesis itself, followed by one of the beam_width predicted tokens. We compute the score of the candidate by adding the log probability of the last word to the previous score. Finally, we compute the normalized score by dividing the score by the length of the candidate. We need this, otherwise, the model would prefer shorter sequences (sequences that produced the
token before the others). - We compare the beam_width candidates corresponding to each hypothesis and keep only the best beam_width candidates among them.
- We apply the algorithm for MAX_CAPTION_LEN times or until all the hypotheses end with an
token.
Larger beam widths will provide better results. They will also require more processing and memory, so we should make a trade-off.
🌠 Conclusion
This was a long tutorial, but hopefully, you had a good grasp of all the phases required to build a TensorFlow/Keras model, which uses images and texts as inputs. In this tutorial we saw:
- How the authors of Show and Tell: A Neural Image Caption Generator implemented an end-to-end neural network for image captioning using CNN and RNN.
- How to create a custom tokenizer using Spacy, which can be used to face this challenge with captions of multiple languages.
- How to store the data inside TFRecords, the file format preferred by TensorFlow.
- How to use the TensorFlow Data API to create datasets out of TFRecords.
- What are teacher forcing and exposure bias.
- How to use the Subclassing API to build a custom model with many layers.
- How to start training a Keras model.
- How to use beam search to obtain the best predictions.
Let’s finally see some predictions made by the model, after training it for 15 epochs over the Flickr8k dataset (predictions were taken on the validation set):
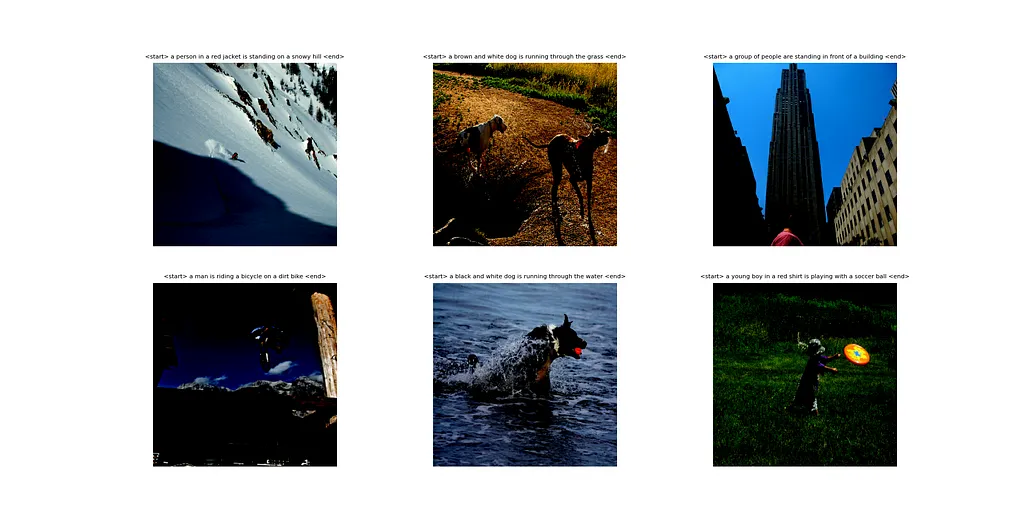
Some validation predictions of the model after training it for 15 epochs over the Flickr8k dataset
Not bad right? The validation loss was still decreasing after 15 epochs, so I could have continued training the model.
With this image we end this journey, hopefully, you learned more about Deep Learning with this end-to-end example!